Install Hue for Production
Minimum Required Role: Full Administrator
 Warning: This page is 1 step toward a production-ready
installation. Watch the Hue Guide for more!
Warning: This page is 1 step toward a production-ready
installation. Watch the Hue Guide for more! Important: Enterprise customers should review Cloudera Installation and Cloudera
Security and work with customer support to ensure a fully secure and production-quality system.
Important: Enterprise customers should review Cloudera Installation and Cloudera
Security and work with customer support to ensure a fully secure and production-quality system.A production-ready installation of CDH and Hue must be robust and secure. At a minimum, it has:
- Custom database for Cloudera Manager and select servers such as Hue, Hive Metastore, Oozie
- High Availability for Hue, Hive, Impala, YARN (Resource Manager), HDFS (NameNode)
- Secure ecosystem with authentication, authorization, data protection, and data governance.
This page explains how to install a custom (external) database for Cloudera Manager server and all applicable CDH components (not only Hue). We also configure Hue with multiple servers and a Load Balancer to increase performance.
Custom Database
On this page, we configure Cloudera Manager and applicable CDH services with MySQL 5.7 on CentOS 7.3.
Continue reading:
Prepare Cluster
When setting up a cluster of machines, you can refresh the default packages, but it is best not to upgrade. Cloudera packages are built with the defaults.
- Prepare at least four machines with a supported operating
system and uniform capacity:
- Data replication defaults to three, so a good minimum configuration is three DataNodes, plus the NameNode, each on their own hosts.
- The HDFS balancer distributes data according to the capacity of the host, so uniform DataNode hosts allows for the even distribution of bytes.
- Ensure that the primary host, with Cloudera Manager server, has uniform SSH access on the same port to all hosts.
- Ensure that all hosts have internet access to (a) standard package repositories and the (b) archives for Cloudera Manager and CDH.
Install Cloudera Manager
 Note: In this installation, we let Cloudera Manager install its agents across the cluster.
- Download cloudera-manager.repo to your package manager source directory. For CentOS 7:
wget https://archive.cloudera.com/cm5/redhat/7/x86_64/cm/cloudera-manager.repo -P /etc/yum.repos.d/
- Install Oracle JDK (sourced from the Cloudera repo)
sudo yum install -y oracle-j2sdk1.7
- Install Cloudera Manager daemons and server (and let Cloudera Manager install the agents)
sudo yum install cloudera-manager-daemons cloudera-manager-server
| OS | Target Dir | Repo |
|---|---|---|
| CentOS / RHEL | /etc/yum.repos.d/ | .../redhat/<ver>/x86_64/cm/cloudera-manager.repo |
| SLES | /etc/zypp/repos.d/ | .../sles/<ver>/x86_64/cm/cloudera-manager.repo |
| Ubuntu | /etc/apt/sources.list.d/ | .../ubuntu/<ver>/x86_64/cm/cloudera.list |
| Debian | /etc/apt/sources.list.d/ | .../debian/<ver>/x86_64/cm/cloudera.list |
Install Custom Database
We install MySQL 5.7 (64 bit) on CentOS 7.3. It can be on one host within the cluster or remotely. For help with other databases and platforms, see Hue Custom Databases.
 Tip: To view logs: tail /var/log/mysqld.log
Tip: To view logs: tail /var/log/mysqld.log- Download MySQL 5.7 from the MySQL Yum repository, install, and start:
wget http://repo.mysql.com/mysql57-community-release-el7-9.noarch.rpm
rpm -ivh mysql57-community-release-el7-9.noarch.rpm
yum install -y mysql-community-server
systemctl start mysqld.service
- Update the temporary password to one that passes the default Validation Plugin options:
sudo grep 'temporary password' /var/log/mysqld.log
mysql -uroot -p
Enter password: <Enter temporary password>
mysql> ALTER USER 'root'@'localhost' IDENTIFIED BY 'Create new root password';
mysql> quit
- Secure your installation. If you make a mistake, simply rerun:
sudo /usr/bin/mysql_secure_installation
Enter password for user root: [Enter new root password]
[...]
Change the password for root ? n
 ... skipping.
Remove anonymous users? Y
[...]
Disallow root login remotely? n
 ... skipping.
Remove test database and access to it? Y
[...]
Reload privilege tables now? Y
All done!
- Enable the server to automatically start on boot:
sudo systemctl enable mysqld.service
- Configure /etc/my.cnf. The bind/listen address and storage engine are important:
- Set bind-address=0.0.0.0 (or comment-out, or remove, if the default).
- Set default-storage-engine=innodb (the default in 5.5 and higher: mysql -V).
- Ensure sql_mode=STRICT_ALL_TABLES to avoid the Known Issue of columns being truncated during migration.
A typical my.cnf file might have these settings: Important: Update my.cnf properties as appropriate for
your environment.## Example of my.cnf settings [mysqld] bind-address=0.0.0.0 default-storage-engine=innodb innodb_lock_wait_timeout=240 innodb_file_per_table=1 innodb_buffer_pool_size=200M innodb_flush_method=O_DIRECT innodb_file_per_table=1 innodb_flush_log_at_trx_commit=2 innodb_log_buffer_size=4M ## Set value to ~ (CPUs/cores) * 2 innodb_thread_concurrency=8 ## For log_file_size errors, see InnoDB Error ib_logfile0 of different size innodb_log_file_size=100M datadir=/var/lib/mysql socket=/var/lib/mysql/mysql.sock user=mysql max_allowed_packet=64M lower_case_table_names=1 sql-mode=STRICT_ALL_TABLES ## Disable to prevent various security risks symbolic-links=0 ## Do not skip InnoDB! #skip-innodb [mysqld_safe] log-error=/var/log/mysqld.log pid-file=/var/run/mysqld/mysqld.pid
- Restart the server:
sudo systemctl restart mysqld.service
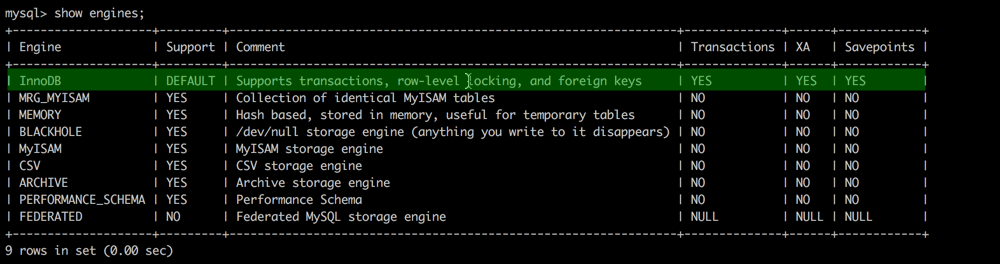
- Ensure InnoDB is the default storage engine:
mysql -u root -p
Enter password: <root password>
mysql> show engines;
mysql> quit
- Create databases and grant permissions (with scripts):
vi mysql_create_dbs.ddl
# Paste into database script
create database scm default character set utf8 default collate utf8_general_ci;
create database amon default character set utf8 default collate utf8_general_ci;
create database rman default character set utf8 default collate utf8_general_ci;
create database hive default character set utf8 default collate utf8_general_ci;
create database hue default character set utf8 default collate utf8_general_ci;
create database nav default character set utf8 default collate utf8_general_ci;
create database navms default character set utf8 default collate utf8_general_ci;
create database oozie default character set utf8 default collate utf8_general_ci;
create database sentry default character set utf8 default collate utf8_general_ci;
Tip: Consider generating random passwords: http://passwordsgenerator.net/.vi mysql_grant_perms.ddl
# Assign passwords and paste into grant script
grant all on scm.*    to 'scm'@'%'    identified by 'scmP@ssw0rd';
grant all on amon.*   to 'amon'@'%'   identified by 'amonP@ssw0rd';
grant all on rman.*   to 'rman'@'%'   identified by 'rmanP@ssw0rd';
grant all on hive.*   to 'hive'@'%'   identified by 'hiveP@ssw0rd';
grant all on hue.*    to 'hue'@'%'    identified by 'hueP@ssw0rd';
grant all on nav.*    to 'nav'@'%'    identified by 'navP@ssw0rd';
grant all on navms.*  to 'navms'@'%'  identified by 'navmsP@ssw0rd';
grant all on oozie.*  to 'oozie'@'%'  identified by 'oozieP@ssw0rd';
grant all on sentry.* to 'sentry'@'%' identified by 'sentryP@ssw0rd';
# Run scripts
mysql -u root -p < mysql_create_dbs.ddl
Enter password: <root password>

mysql -u root -p < mysql_grant_perms.ddl
Enter password: <root password>
- Verify the connection to the scm database:
mysql -u scm -p
Enter password: scmP@ssw0rd
mysql> quit
Prepare Database
The Cloudera Manager server only starts with the JDBC driver on every applicable host.
- Install the JDBC driver on every host in the cluster (or on every host with a server role that uses a
custom database).
# Downlaod and unpack MySQL/J connector
wget https://dev.mysql.com/get/Downloads/Connector-J/mysql-connector-java-5.1.41.tar.gz
tar zxvf mysql-connector-java-5.1.41.tar.gz

# Create directory /usr/share/java if it does not exist
sudo mkdir -p /usr/share/java/

# Copy to /usr/share/java
sudo cp mysql-connector-java-5.1.41/mysql-connector-java-5.1.41-bin.jar /usr/share/java/mysql-connector-java.jar
- Prepare scm database (only on the host with Cloudera Manager server):
/usr/share/cmf/schema/scm_prepare_database.sh mysql scm scm
Enter SCM password: scmP@ssw0rd
Note: If you installed MySQL remotely, use the options to set hostname. See Syntax for scm_prepare_database.sh.
/usr/share/cmf/schema/scm_prepare_database.sh mysql [options] dbname username password
- Start the Cloudera Manager server!
sudo service cloudera-scm-server start

Install CDH and Hue
Note: Ideally, Hue should always use a custom database and be configured with 3+ servers and 1 or 2
load balancers.- Point a browser to the host with Cloudera Manager server:
http://myhost.example.com:7180/
- Log on to
 as admin/admin.
 - Install CDH and Hue with Cloudera Manager Installation Wizard.
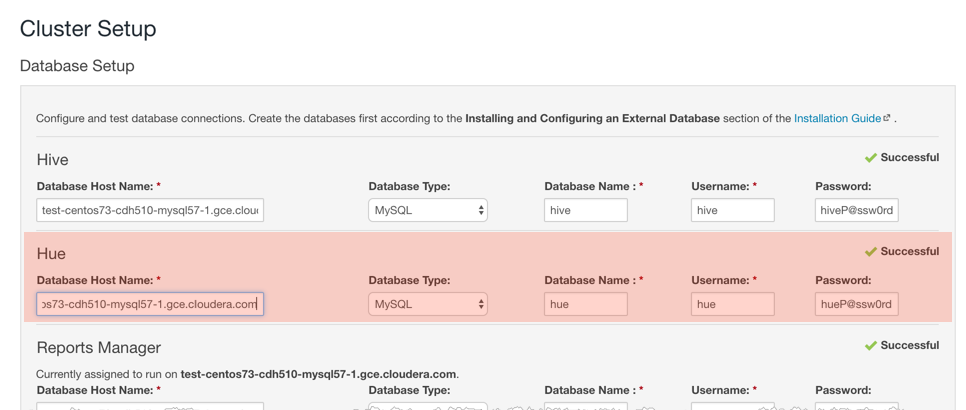
- Stop
 at the Database Setup page and set all
database properties for name, username, and password. Hostname and database type should be set.
at the Database Setup page and set all
database properties for name, username, and password. Hostname and database type should be set.
- Stop
- When Hue is running, add more Hue servers and a Load Balancer:
- Select .
- Add 2 additional Hue servers (for a total of 3) and click OK.
- Add 1 Load Balancer and click .
- Check the boxes for the new servers and load balancer.
- Select .
- Click Save Changes and Restart Hue.
- Click .
- Log on to Hue
 and ensure the port
is 8889.
and ensure the port
is 8889.
Page generated August 14, 2017.
| << How to Install a Specific Version of CDH and Hue | ©2016 Cloudera, Inc. All rights reserved | Install Hue on EC2 in AWS >> |
| Terms and Conditions Privacy Policy |